Sunday, February 17, 2013

Bright Stripes Beanie


Hello again beautiful people!

Well its been a busy few weeks. Ive got a lot on the go right now, and some super exciting things in the works. You can expect a lot of patterns coming up and a lot of fun scrap kits and some other crafty endeavours including some baking!

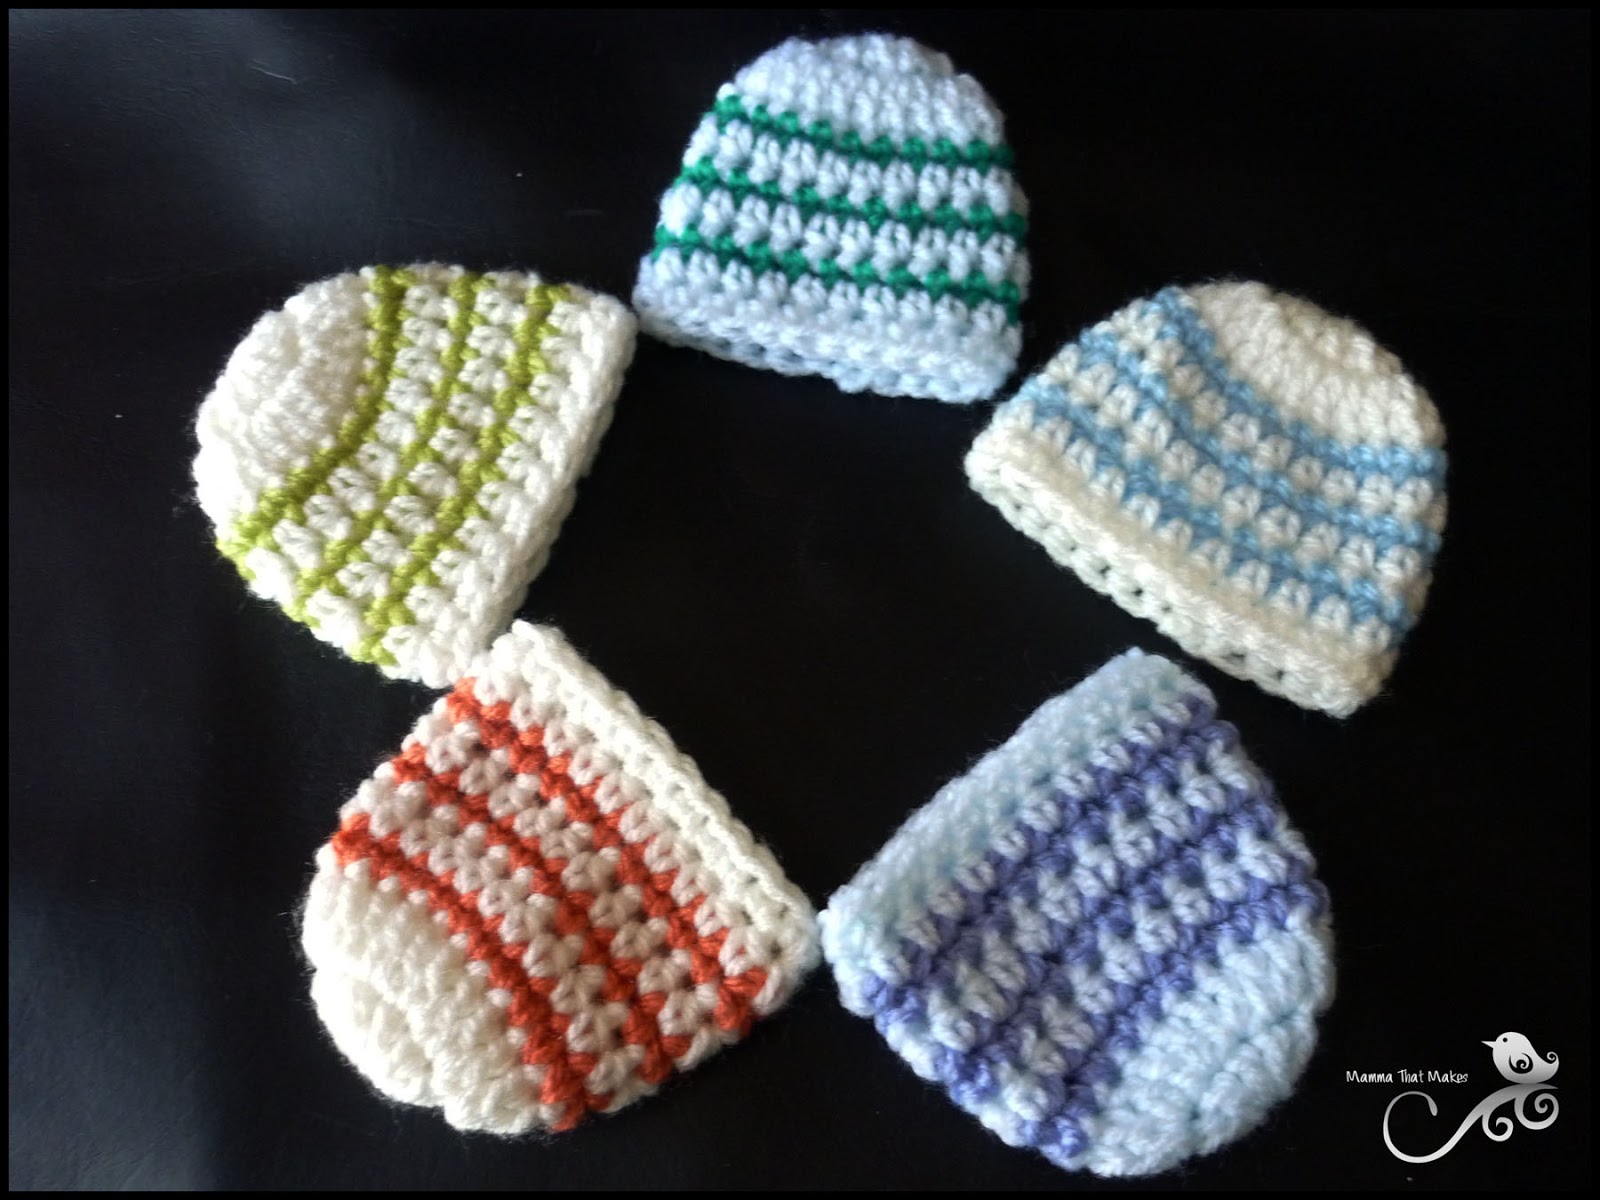
Today I have another small beanie pattern (Hey variety right?) that I designed to work specifically with brighter or darker colours. The ones people often steer clear of when making prem gear (but usually have a heap of scraps and small balls of kicking about. Now obviously you don't want to make a solid navy blue cap for a bub that has passed, I think we can all agree that would look terrible against their skin, however with a little creativity and some contrasting yarn, you can use pretty much any colour successfully to make a beanie for these wee ones. This cap looks especially great with bright colours for the stripes, giving a simple beanie a pop of colour. Again, this is a super simple beanie and even a learner could tackle this!


Made as instructed the beanie will fit 18-20 weeks gestation, however you can easily adjust it to fit larger bubs.

You will need:
dk weight yarn in 2 colours
3.5mm hook
needle for sewing in ends

With your lighter colour
Rnd 1: ch3, dc 10 times into the first chain, join.
Rnd 2: ch3, dc in the same stitch, 2dc in each stitch around
Rnd 3: Join contrasting colour with a sl stitch, ch1, sc in each stitch around, join. (don't end off the yarn, simply drop it and pick up the main colour. This leaves less ends to weave in)
Rnd 4: Pick up main colour, ch2, hdc in each stitch around, join.
Rnd 5: Pick up contrasting colour, ch 1, sc in each stitch around, join.
Rnd 6: Pick up main colour, ch2, hdc in each stitch around, join.
Rnd 7: Pick up contrasting colour, ch 1, sc in each stitch around, join. End off contrasting colour here.
Rnd 8: Pick up main colour, ch2, hdc in each stitch around, join.
Rnd 9: ch1, sc in each stitch around, join.

End off and weave in all ends.

DUTCH TRANSLATION - met dank aan Karin

Wol:
Scheepjes Colour Crafter met haaknaald 3 of 3.5 of Soft van Zeeman met haaknaald 2.5 of 3 in zachte kleurtjes Je kunt dit mutsje ook met verschillende kleuren haken zoals je boven op de foto ziet of in 1 kleur.

Of haakkatoen geschikt voor haaknaald 2 dan wordt het een stuk kleiner maar die maatjes zijn soms ook nodig.

Start met de lichte basiskleur

Rij 1:
Haak 3 lossen (of haak een magische ring) haak 10 stokjes in 1e losse, sluit met halve vaste

Rij 2:
Haak 3 lossen, haak 1 stokje in dezelfde steek, 2 stokjes in elke overige steek, sluit met halve vaste

Rij 3:
Haak met contrasterende kleur verder, haak 1 losse, haak 1 vaste in elke steek, sluit met halve vaste. Hecht de kleuren niet af maar ga haak daar iedere keer verder mee dat scheelt afhechten

Rij 4:
Ga verder met basiskleur, haak 2 losse, haak 1 half stokje in elke steek, sluit met halve vaste

Rij 5:
Ga verder met basiskleur, haak 1 losse, haak 1 vaste in elke steek, sluit met halve vaste.

Rij 6:
Ga verder met basiskleur, haak 2 losse, haak 1 half stokje in elke steek, sluit met halve vaste

Rij 7:

Haak met contrasterende kleur verder, haak 1 losse, haak 1 vaste in elke steek, sluit met halve vaste. Hecht deze kleur af, werk draadje weg.

Rij 8:
Ga verder met basiskleur, haak 2 losse, haak 1 half stokje in elke steek, sluit met halve vaste,

Rij 9:
Haak 1 losse, haak 1 vaste in elke vaste, sluit met halve vaste.

Hecht af en werk draadjes weg


Thats all there is to it :) It shouldn't take more then 30 minutes tops to make one of these. Fast crocheters will probably whip one up in 15-20 minutes.

Friday, February 8, 2013

Crocheted Baby Sneakers - Free Pattern


 Hi there peeps!

Today I have a new pattern, a super cute pair of newborn sneakers! Adorable, cute, fun!
Now I know this idea is nothing new. In fact there are a few various styles and types and ways. Ive had a look at some and frankly, they drove me mental. Most wouldn't work and the ones that looked like they might had so many steps my mind boggled.

Im sure you guys know by now, I like simple and easy, so I sat down and worked on these little beauties. I used the basic sole from my simple sandals and went from there. I have to say, I am mighty happy with how they turned out, and how simple they are to make! I've added step by step images to help out anyone that is new to it all.

Hope you enjoy and I look forward to seeing your completed piccies! Seriously, more of you need to share them on Ravelry, I really love seeing how things turn out and all the fun colours Im sure you use!

Supplies:
DK weight(8ply) Yarn in white for the sole and tongue, black for the stripe and a main colour.
4mm hook
2 stitch markers
sewing needle

Starting with the sole

1: Ch 10, hdc into the 3rd chain 4 times, hdc into the next 2 chains, dc into the next 4 chains, 6dc into the last chain, working on the opposite side (backs of the chains you just used) dc in the next 4 chains, hdc in the last 2, join to the first hdc. (22)


2: ch1, sc twice in the same stitch, 2sc in the next stitch, sc in the next 10 stitches, 2sc in the next 2 stitches, sc in the next 8 stitches, 2sc in the last stitch, join to the first sc, sl st into the next sc to centre the yarn. (28)

3: ch1, 2sc in the next 2 stitches, sc in the next 9 stitches, 2sc in teach of the next 4 stitches, sc in the next 9 stitches, 2sc in each of the last 3 stitches, join. (36)


4: ch1, sc in each stitch around, back loops only, join (36)


5: Join black, ch1, sc in each stitch around, join. (36)


6: Join white, sc in the next 12 stitches, dc2tg 6 times, sc in the next 12 stitches, join. End off white and weave in ends.(30)


7: Using your stitch marker, mark off the 11th stitch on each side (second stitch back from the dc2tg on each side) Join main colour into the 10th stitch on the left side (when the toe is facing you)hdc in the same stitch as joining and hdc in the next 19 stitches. (20)


8: ch2, turn, hdc2tg, hdc in the next 16 stitches, hdc2tg. (18)


9: ch1, turn, sc2tg, sc in the next 14 stitches, sc2tg. (16)


10: ch1, turn, sc2tg, sc in the next 12 stitches, sct2g. (14)

11: ch1, turn, sc in all 14 stitches. End off and weave in ends. (14)


Making the tongue
with white

1: ch5, hdc in the second chain from hook and the next 3 chains (4)
2: ch2, turn, 2hdc in the next stitch, hdc in the next 2 stitches, 2hdc in the last stitch. (6)
3-5: ch2, turn, hdc in each stitch across. (6)
6: ch2, turn, hdc in the first 2 stitches, dc in the next 2 stitches, hdc in the last 2 stitches (6)
7: ch1, turn, sc in the first stitch, 2dc in the next stitch, 2trc in each of the next 2 stitches, 2dc in the next stitch, sc in the last. End off leaving a long tail for sewing.


Turn the top row of stitches down and sew flat, this gives the top of the tongue more stability.
With the bottom of the tongue lined up with the toe of the shoe, sew into place. I tend to sew it using the back loops of the toe row (6) so the shoe has a raised edge around the toe, but it is really up to you on how you attach it.


To make the tie, chain 80.


I told you it was easy, didn't I! Now you just need to make a second one! Hope you guys have as much fun with these as I did.


Friday, February 1, 2013

ScrapHappy MicroPrem Cap


Hello peeps!

Wow its been a little since my last post! Its almost back to school time here in Tas and with 3 girls all going back in a few days its been busy busy busy! Thankfully I have some time to sit down today and get this pattern up for you all.

Now, if your anything like me, you probably hang onto leftover bits of yarn. The small of-cuts that will never make any one thing, but you just can't throw them out! Waste not, want not right? Maybe Im just odd, but I tend to hang onto anything thats more then 2 meters long.

Ive been looking at all these little odds and ends, and thinking, Gee I really need to start using these! So many colours, various fibres, a bit of everything really. So I sat down and worked on a simple beanie that uses scraps. Then I decided that it needed some UMPH and well, who doesnt have a stash of fun embellishments! Plus, it gave me another excuse to use the glue gun!


The best part about this hat is you can use up all sorts of colours. If you have darks and brights  just end with a light row that wont clash with bubs skin :) For embellishments: I have an assortment of iron ons, buttons, rhinestones and things from the scrap booking isle which actually work pretty perfectly for these small single use hats!


So you will need
Main colour in 8ply (dk weight) yarn
Scraps of 2 contrasting colours
4mm hook
If you choose, embellishments.

1. ch2, dc 8 times in the 1st chain, join
2. ch2, dc in the same stitch, 2dc in each remaining stitch around, join
3. ch2, dc in the same stitch, *dc in the next stitch, 2dc in the next stitch*, Repeat around, join.
4. ch2, dc in each stitch around, join.
5. ch2, dc in each stitch around, join. End off main colour.
6. Join contrasting colour with a sl st, hdc in the same stitch and hdc in each remaining stitch around, join.
7. Join the last colour with a sl st, sc in the same stitch and  sc in each stitch around, join.

Weave in all ends. If you like, add embellishments now.


There we go, 7 rows and a microprem hat is done! Try playing with the colours, or even the fibres you use (tho I wouldnt recommend anything overly fluffy) Mine fit around 22 weeks gestation. If you wanted to make them larger, add another row of increases after row 3, but also add an extra row of dc after row 5. Using a 3mm hook with give you an even smaller 19/20 week gestation beanie.


Pattern 5/52 for 2013
Images copyright Myshelle Cole, please do not use without permission.